Showing posts with label social media. Show all posts

Monday, February 3, 2025

Bluesky Social

Good morning, and happy Monday, good people of the blogosphere! Today, we're talking about Bluesky, the Twitter replacement. This little app that could has over twenty-one million users as of now, probably due to the mass exodus of X (the app formerly known as Twitter). We'll dive into all the ways it's similar to the Twitter of old, and I'll show you a few things you might not have known about. Ready? Get cozy, grab a cup of coffee, and let's get going!

So, Bluesky. What is it? Where did it come from? How can you use it? What are the awesome features it has that you may not know about? How can you sign up? These are the questions we'll answer today. If you happen to have other questions, feel free to drop them in the comments, and I'll do my level best to find out for you.


What is Bluesky?

Well, it's a mobile and web app that's rather like the Twitter of old. You can post short, to-the-point sentences and use hashtags or media to enhance said post. You can create specific feeds, follow and block, and even send DMs.

Where the heck did Bluesky come from?

According to Britannica, it's actually been around a long time (since 2019), but it's only recently (2023) become available to the public. It's biggest growth happened last year when Twitter changed its name to X and the CEO changed the company's direction. X is being changed to an "everything" platform, while Bluesky will continue to be more like Twitter (but with differences). Add to that, Bluesky is open source, meaning you can tweak it. More on that later...

Is anyone else bored with these answers? I am. Let's get into the fun stuff.

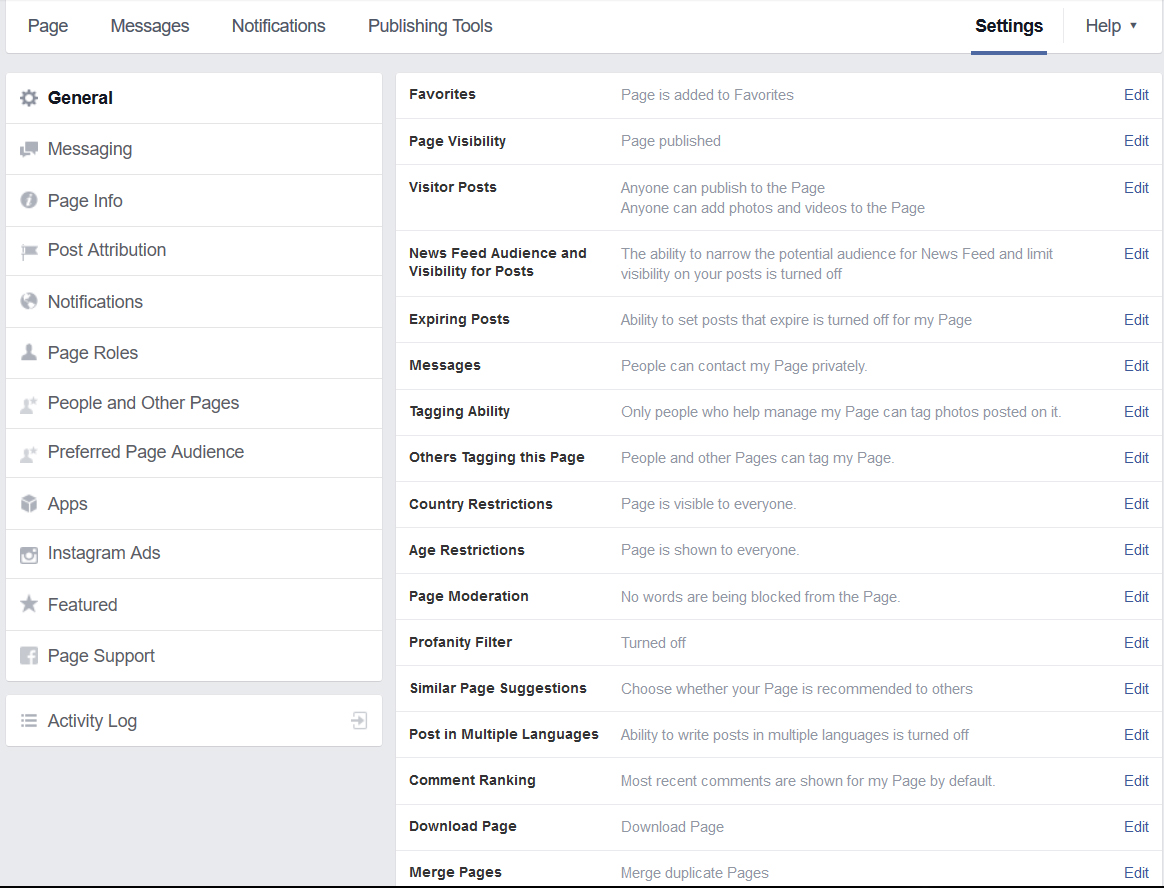
Sign up by clicking here. It's super easy and only takes a few minutes. You can also download the app for iPhone or Android, so you can use it on your phone. Once you do that, you'll be able to navigate to settings:

As you can see, you have options to change quite a few things:

  • Add another account
  • Account
  • Privacy and security
  • Moderation
  • Content and media
  • Appearance
  • Accessibility
  • Languages

You also have the ever-needed Help and About sections.

  • Add another account - This allows you to have another handle (username) with a different email address.
  • Account - If you click this one, you can change your password, birthday, etc.
  • Privacy and security - You can enable two-factor authentication (recommended), and prevent users of the app from seeing you when they're logged out. Because it's an open-source platform, other apps may still be able to see your profile. Just click it and do some reading/exploring.
  • Moderation - This option is rather vast, so I suggest checking it out and getting into the nitty gritty, but on a basic level, you can hide nudity (artistic--other nudity isn't allowed), block, or select keywords to unsee.
  • Content and media - Manage saved feeds (more in a minute), allow auto-play for other apps, and get down in the nuts and bolts of your follow feed. This app lets you create your own experience, so learning how to use all these things can only help you.
  • Appearance - Choose your color mode, size of the text (yay!), theme (dark/light), and font here.
  • Accessibility - Alt texts requirements. This is for folks who use a reading app for sites. It tells them what the image is as a descriptor.
  • Languages - You can choose from a bajillion languages for your feed, the app, and your content.

When you click your profile from the menu on the left:

 You'll see these options:

That partially hidden one is Lists.

This is your stuff. Your posts, replies, media, etc. HOWEVER, this is where you can have some fun! If you click on Feeds, you'll see only posts from the feeds (#) you've chosen. If you'd like to add Feeds to this section, click Feeds in the menu on the left and make some choices. Just click the + icon at the left of the feed to add it to your list. Very cool, right?

Let's go a little deeper.

If I click on the Artists: Trending feed, this is the first post:

and if I click on that, I get this:

It tells you exactly how to join and participate in that feed. There's a TON more information on that page, so scroll down and read!

Now, let's go into how you start your own kind of community. If you click on Starter Pack, it allows you to either have one begun for you or for you to create one yourself. You name it, add stuff, and invite people.


Last, but certainly not least, you can make yourself Lists. This is a throwback from Twitter, and I had a ton of lists there so I could only see the people I wanted to see. To add someone to a list, first create a new list by clicking Lists on the menu on the left, then click the three dots on the person's profile page who you'd like to add, select add to Lists, and then choose which list you'd like them on.

Easy peasy, lemon squeezy.

There are a ton of things you can do with Bluesky as a developer, but most people I know just want to see what they want to see, so this quicky walked you through that. You can add apps on the platform to do other things, and if you're into that, by all means... This is just what I could reasonably fit into a single blog post. :)

I hope this post helps you get the most out of your Bluesky experience and that you enjoyed the read! :D

Also, if you'd like to connect on Bluesky, I'm here.

That's all for today, folks! Until next time, WRITE ON!

Jo

Monday, April 18, 2016

Goodreads Demystified

Happy Monday! Today, I'm making a post for all those new authors out there struggling to get a grip on good old Goodreads. There will be some info in here for old hands, too, so give it a skim and pick and choose what you think may help YOU. I'm going to break it down into sections so you can find what you need more easily. Not a long intro today, because this puppy will be LONG. Ready? Let's get going!

CREATING AN ACCOUNT

Go to Goodreads.com:


Fill out the boxes and click "sign up with email" unless your author name is your FB name (if they're the same, click sign in with Facebook--not sure how you'd choose to do that because of all the Amazon/FB "stuff" going on). ANYway:


Leave off connecting any of your social media right now. You can always do it later. Click "skip this step":


Please also skip the reading challenge question (dear me, this is a lot of stuff to add to an account setup):


Because Goodreads is primarily a site for readers, they want you to select your favorite book genres so they can match you with people with similar interests or recommend books to you. Do that and click Continue:


Skip the ratings page by clicking:


Yay! Now we're finally to your profile (sort of)! Click the big green button:


Now, really quickly, go to your email and verify your account.

APPLYING FOR AN AUTHOR PROFILE IF YOU ALREADY HAVE A BOOK LISTED

Now go to the search bar in the top and type in the title of your book (I'm searching for a random title because Jo Michaels is already claimed and can't be claimed again):


Click on it. Then click on the author name:


You'll see this. Click on "let us know":


Fill it out and click "submit application":


All done! Now, you sit back and wait to be approved!

APPLYING FOR AN AUTHOR PROFILE IF YOU DO NOT HAVE A BOOK LISTED

After you have an account for 24 hours, go to the search bar in the top and type in the title of your book (going with something I know isn't published) and hit enter:


If your book isn't listed (and it shouldn't be), click "manually add a book" (for tutorial reasons, I had to go back to my other profile--this one hadn't been active long enough to add a book. You CAN have an established friend go in and add your book):


Fill it out. Goodreads will give you hints and tips on how to fill out the page as you go along. If you don't have an ISBN, go ahead and pop over to CreateSpace, create a new title, and click give me a free ISBN. Use that. Obviously, I won't be adding a non-existent book, but you get the idea. Don't forget to go to the top, right hand side and upload your cover. Once you're done, click "create book":


Wait about 10-15 minutes, then do the steps for applying for an author profile if you already have a book listed as outlined above.

Now, you're ready to rock and roll!

Tomorrow, I'll go through filling out your shiny new author profile that you should have by then, and I'll introduce you to some cool Goodreads features like events, giveaways, and groups.

Any questions?

If you're a SASS member, write your questions down and hang on to them. I'll address your concerns on our call later this week.

Well, that's all for today, folks! Until next time, WRITE ON!

Jo

Tuesday, March 29, 2016

Facebook Page Basics - Getting Ready for Likes

Happy Wednesday, everyone! Today is a post for the newer authors, those who don't have a Facebook page or those who are thinking about starting one. If you're an old hand, feel free to skip this one. For all of you sticking around, grab a pen and notebook and let's get going!

Okay, in order to have a Facebook page, one must first have a Facebook account. If you don't have one, go to Facebook.com now and sign up.

Done? Good. Now, look on the left hand side of the screen. You'll see this:


Click it.

Here's where the fun begins! When you click Create a Page, you'll be taken to a screen like this:


Each of the squares you click on will open a dropdown with a number of choices. Because we're focused on author pages, you want to click the bottom left box (Artist, Band, or Public Figure) and choose Author. Type in your name and click Get Started.


I'm going to pause here for a moment and talk with you about your name choice. There are a ton of first time authors who create a page for their book or series rather than their author name. This is amazing if you only plan to write one book or one series of books, but what happens when you have fifty or more books out? Are you going to have fifty pages? Why not keep all those fans in one place and just have one page to keep up with?

Now that you've thought about it, let's move on.

I typed in Forexampleonly as my name, because I plan to delete this page once we're done here.

Now you'll see this:


This first tab is the basic stuff you'd expect. You add a description of what your page is about (don't use your author bio, please) in about 200 characters, and what fans can expect to find there. Add your website address, too.

I know you "can" skip it, but please don't. Let's just get it done and over with, okay?

VERY IMPORTANT: Once you SET your PAGE URL, it can only be changed ONE time. People will be notified if you ever do--that screams, "I had no idea what I was doing when I set this up." Choose this wisely (should usually be your author name, as simply as possible), so you won't have to deal with all that.

Here's mine:


Now, click Save Info and let's move to step 2:


Ideally, your profile photo should be square (1:1 ratio) and around 200dpi. As you can see, you can either upload one from your computer or grab one from the web. Do that now. Mine is 6" X 6" at 200dpi in RGB colorspace. I added some graphics around the edge so you can see how nicely it fits.


See? No crop!

Click Next and go to step 3:


Yes, add it to your favorites. That way, it'll show up on the left side of your main feed at the top rather than under the word Pages.

Click Next and go to step 4:


This is where you define your target audience. Hint: "everyone" is not a target audience. Be specific. These are the folks who will be shown your page most often.

Age range goes from 13 to 65+. Choose their location(s). Add their interests. Be specific! I know I said that already, but it bears repeating. For this one, I'll do age 18-35, men and women, with interests in publishing, who live in the US, UK, and Australia.


Click Save and admire your new page!


Facebook will walk you through looking around at all the "stuff" you now have to play with. Go ahead and get clicky with it, and then come on back here and I'll show you a couple more things.

You back? Okay, cool! Now, on to your banner! Here's the size requirement: 851px wide X 315px tall at 72dpi. If you make the resolution any higher, Facebook will resize it, and it'll look janky. If you need a template, you can use this one:


Once you get your banner made, click Add a Cover and upload!

Before I go, I want to show you Settings and how to schedule a post to publish in the future. Click Settings.


Be sure you go through every single tab and set your page up exactly the way you want it. This is also where you can add other people to your page as admins, block specific keywords, and turn on profanity blocker. Yes, it's a lot, but it's worth it.

This page's URL is: https://www.facebook.com/forexampleonly/

That's it. No string of numbers or all that other shizz. Why? Because we took the time to set it when we created it.

To create a post that'll publish on a future date, click in the box that's ghosted Write Something... and type in what you want to share. DON'T CLICK PUBLISH. Instead, click the arrow next to publish and get the dropdown menu. Looks like this:


Click on Schedule.


Choose the date and time you want the post to go up. You have to actually click on the boxes and type in the time manually, but the calendar is a dropdown select.

Guess what? You're done!

You're now ready to share your page with the world. Get out there and get busy. Don't forget to invite your friends to like your page!

Once you have a handle on how all the basic tabs work, take a look at the Insights. Here's a post I wrote that'll walk you through all those cool features.

Did that help? Any of this you didn't know?

Well, that's all for today, folks! Until next time, WRITE ON!

Jo

Monday, March 14, 2016

HeadTalker - What it is, How to use it, and Why it's Awesome

Happy Monday, everyone! Today's post is going to be rather long-ish, but you'll want to read all the way to the end. We'll be getting into a new marketing tool called HeadTalker. I'll show you why it's awesome, how to use it, and go into how you can apply it to your current marketing strategy. Ready? Grab those pens and notebooks, and let's get going!

As you're all aware, I'm never paid for anything I talk about here on my blog, and there are no affiliate links. This is why I'm free to speak my mind. I don't owe anyone anything, and no one owes me. Recommendations made here are 100% because I loved the product. Now that I've restated that, we can move on.

I'm gonna start with a big WHAT IS HEADTALKER? snippet.


HeadTalker works like Thunderclap, a social media blasting platform, with more options and more ways to get your message trending. Plus, HeadTalker has some REALLY cool features Thunderclap doesn't.

If you don't know what Thunderclap is, go check out this post.

Please understand, I'm not saying you should use one of these over the other, but HeadTalker is another platform to put firmly in your corner because of the features.

Speaking of, let's get rolling on those, shall we?

Social Media Platforms - There are Four
  • Twitter
  • Facebook
  • Tumblr
  • LinkedIN
Campaign Features (this is where it gets really cool)
  • Video (book trailer!)
  • Share Image (I'd love to see them add design specs to this and the next one)
  • Background Image (see comment above)
  • Media Embed (images, music, etc...)
  • Set Supporter Goal (between 25 and 500 - ANY number)
  • Include a Giveaway
I have to be honest, when I saw all the bonus features, I got really excited. I did run an experiment to see just how it worked, and I'll get to that after I show you all the "fill me out" things (which will happen now).

CLICK THE IMAGE TO ENLARGE

As you can see, you have a campaign title, message you want to go out, a URL, the place to embed your YouTube video, featured photo and background photo, a category, your story (which you can edit at any time without having to resubmit and will hold things like music and photos), your supporter goal, a start and end date with a time to go live, and a giveaway option.

Now, once approved, you can't change your URL or message. Those are fixed. You'd probably have to delete your campaign and start over.

Anyway, I did a little test to run through the functionality and check out all the features. Here's how I set mine up:

CLICK THE IMAGE TO ENLARGE

I also did a $20 giveaway (the minimum, to see just how it worked). One thing I didn't use was the background image option because I wasn't sure what it was and didn't want to muck up the look.

Once my campaign was live, I got a PayPal invoice for $22. HeadTalker takes 10% off the top for handling the giveaway for you. Not too shabby. I put it out there and don't have to worry about it again. For what it's worth, I love simple. *grin*

Now, here are the stats broken down by time:
15 min shot
30 min shot
45 min shot
1 hour shot - Notice I hit my goal of 35
6:56PM
At 10:27PM I got a message that said my HeadTalker was trending and was on the homepage. 
SCORE! After that, this happened!
1:01AM
8:36AM
10:45AM
4:22PM
Today at 11:33AM

As you can see, the numbers are astounding (I'll give a comparison to the other one on Thunderclap in a moment). Now, when I first got the message that my campaign was ready to start gaining supporters, there were a number of links included (this is also pretty fun, so stay with me).

There was a link to the HeadTalker Academy (I highly recommend going through this even if you think you know what you're doing - several tips and tricks there.

Another took me to FAQ (self explanatory, no?).

Still another took me to Success Stories (those were fun and interesting to look through - think of it as a "what works well" class).

But, by far, the most interesting one took me to the HeadTalker Market. This is the place where you can pay others to support your campaigns or have others pay you to support theirs. Now, I don't know about you, but I think this is flipping brilliant. If you can't get the support you need any other way, or if you're serious about making the biggest impression possible and have the cash to lay out there, I don't see limits on your potential reach. Might be better than doing a cash giveaway. Hell, it might be awesome as a passive kind of income, too, if you have a strong social media presence.

So, anyway, for a price (from $1 on up, depending on social reach ability), you can get limitless support for your campaign. I didn't do this, but the option is totally there.

Now for a comparison screenshot of my other campaign. We set this one to go at noon, and HeadTalker to fire at 5PM day of release. This was taken today at 11:33AM.


Is there even a comparison? It's literally crazy, right? Or am I missing something?

What do you think? Will you make the jump from one to the other? Use both? Do you see any downsides?

Well, that's all for today, folks! Until next time, WRITE ON!

Jo