Okay, in order to have a Facebook page, one must first have a Facebook account. If you don't have one, go to Facebook.com now and sign up.
Done? Good. Now, look on the left hand side of the screen. You'll see this:

Click it.
Here's where the fun begins! When you click Create a Page, you'll be taken to a screen like this:

Each of the squares you click on will open a dropdown with a number of choices. Because we're focused on author pages, you want to click the bottom left box (Artist, Band, or Public Figure) and choose Author. Type in your name and click Get Started.

I'm going to pause here for a moment and talk with you about your name choice. There are a ton of first time authors who create a page for their book or series rather than their author name. This is amazing if you only plan to write one book or one series of books, but what happens when you have fifty or more books out? Are you going to have fifty pages? Why not keep all those fans in one place and just have one page to keep up with?
Now that you've thought about it, let's move on.
I typed in Forexampleonly as my name, because I plan to delete this page once we're done here.
Now you'll see this:

This first tab is the basic stuff you'd expect. You add a description of what your page is about (don't use your author bio, please) in about 200 characters, and what fans can expect to find there. Add your website address, too.
I know you "can" skip it, but please don't. Let's just get it done and over with, okay?
VERY IMPORTANT: Once you SET your PAGE URL, it can only be changed ONE time. People will be notified if you ever do--that screams, "I had no idea what I was doing when I set this up." Choose this wisely (should usually be your author name, as simply as possible), so you won't have to deal with all that.
Here's mine:
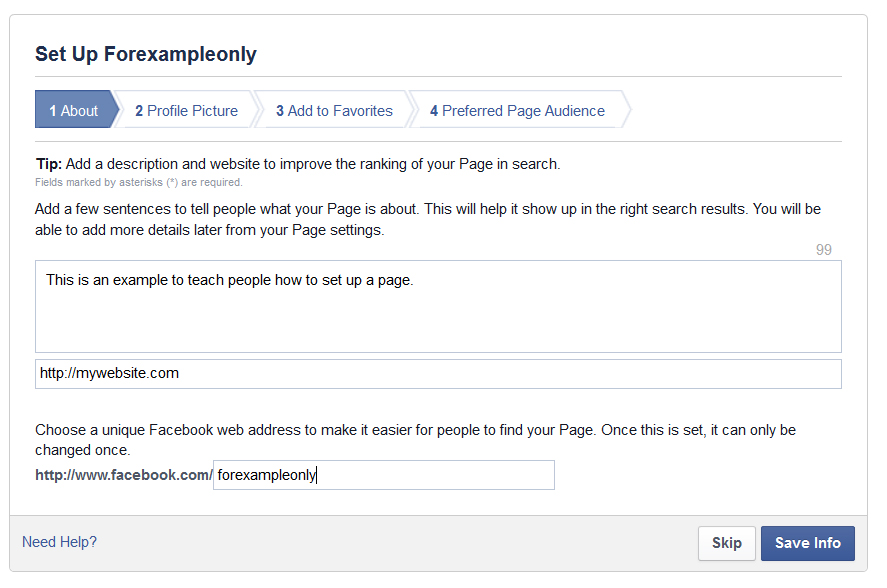
Now, click Save Info and let's move to step 2:

Ideally, your profile photo should be square (1:1 ratio) and around 200dpi. As you can see, you can either upload one from your computer or grab one from the web. Do that now. Mine is 6" X 6" at 200dpi in RGB colorspace. I added some graphics around the edge so you can see how nicely it fits.

See? No crop!
Click Next and go to step 3:

Yes, add it to your favorites. That way, it'll show up on the left side of your main feed at the top rather than under the word Pages.
Click Next and go to step 4:

This is where you define your target audience. Hint: "everyone" is not a target audience. Be specific. These are the folks who will be shown your page most often.
Age range goes from 13 to 65+. Choose their location(s). Add their interests. Be specific! I know I said that already, but it bears repeating. For this one, I'll do age 18-35, men and women, with interests in publishing, who live in the US, UK, and Australia.

Click Save and admire your new page!

Facebook will walk you through looking around at all the "stuff" you now have to play with. Go ahead and get clicky with it, and then come on back here and I'll show you a couple more things.
You back? Okay, cool! Now, on to your banner! Here's the size requirement: 851px wide X 315px tall at 72dpi. If you make the resolution any higher, Facebook will resize it, and it'll look janky. If you need a template, you can use this one:

Once you get your banner made, click Add a Cover and upload!
Before I go, I want to show you Settings and how to schedule a post to publish in the future. Click Settings.

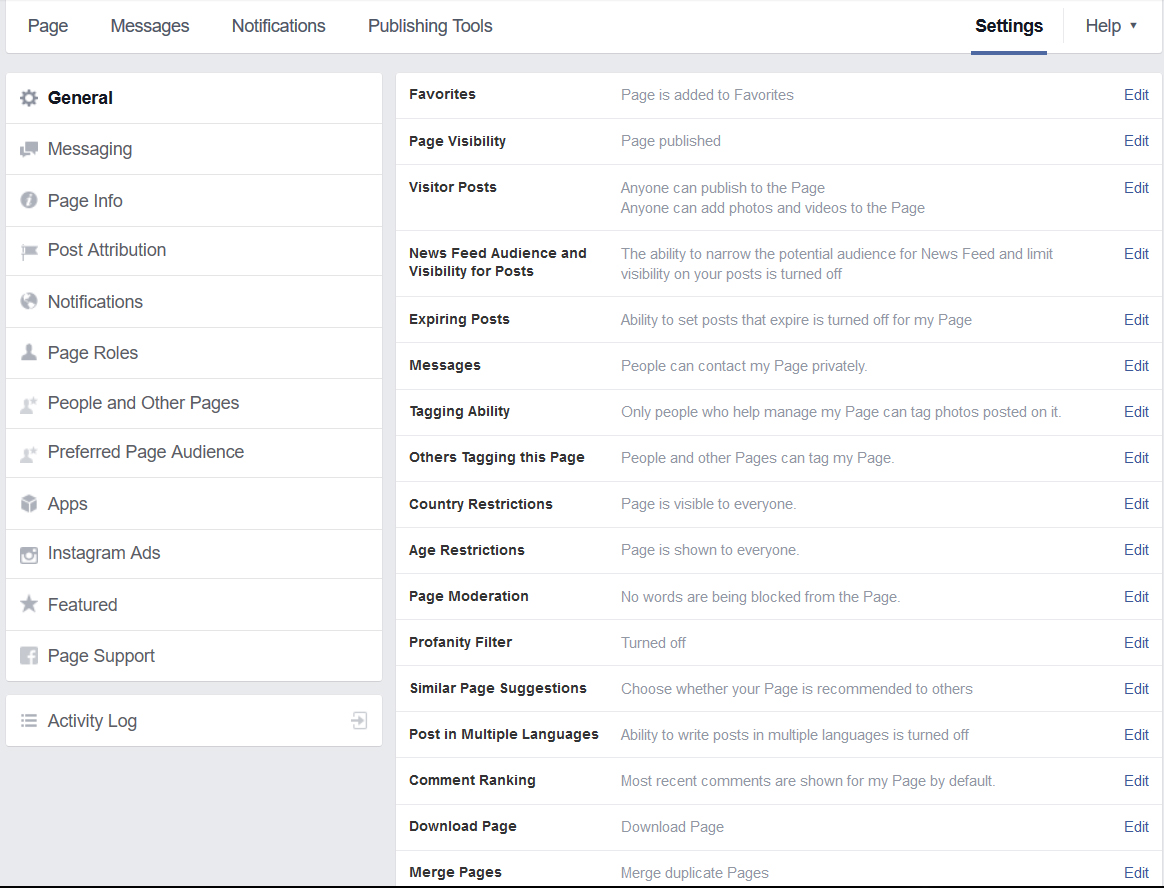
Be sure you go through every single tab and set your page up exactly the way you want it. This is also where you can add other people to your page as admins, block specific keywords, and turn on profanity blocker. Yes, it's a lot, but it's worth it.
This page's URL is: https://www.facebook.com/forexampleonly/
That's it. No string of numbers or all that other shizz. Why? Because we took the time to set it when we created it.
To create a post that'll publish on a future date, click in the box that's ghosted Write Something... and type in what you want to share. DON'T CLICK PUBLISH. Instead, click the arrow next to publish and get the dropdown menu. Looks like this:

Click on Schedule.

Choose the date and time you want the post to go up. You have to actually click on the boxes and type in the time manually, but the calendar is a dropdown select.
Guess what? You're done!
You're now ready to share your page with the world. Get out there and get busy. Don't forget to invite your friends to like your page!
Once you have a handle on how all the basic tabs work, take a look at the Insights. Here's a post I wrote that'll walk you through all those cool features.
Did that help? Any of this you didn't know?
Well, that's all for today, folks! Until next time, WRITE ON!
Jo
No comments:
Post a Comment
Comments for this blog have been turned on. If the SPAM starts up again, I'll have no choice but to CAPTCHA. Sorry to all the real people.